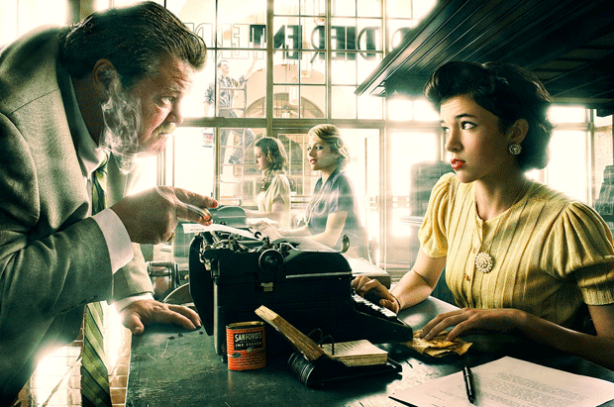
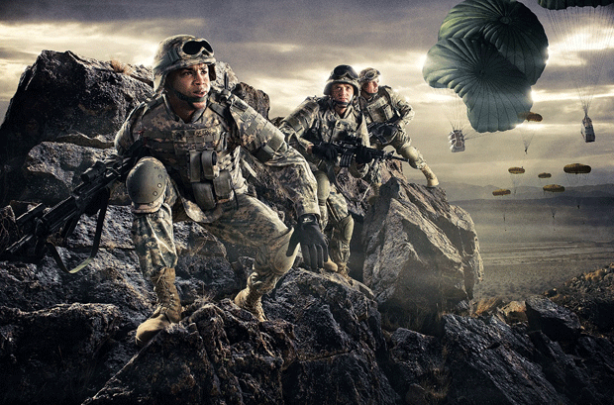
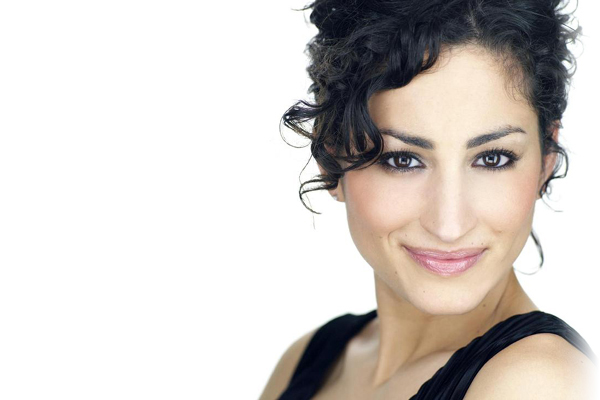
“There is no object so foul that intense light will not make it beautiful.” ~Ralph Waldo Emerson
ANNIE LEIBOVITZ
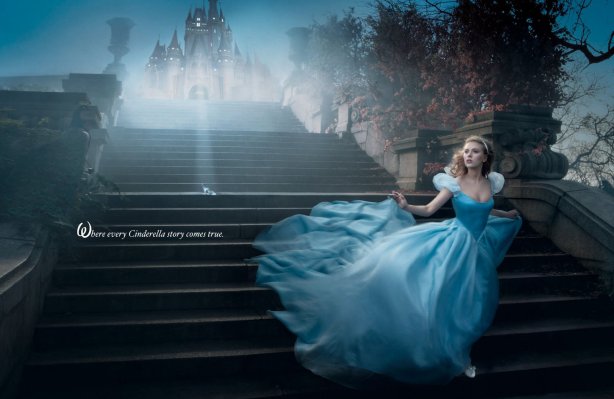
Scarlett Johansson as Cinderella “Where every Cinderella story comes true”


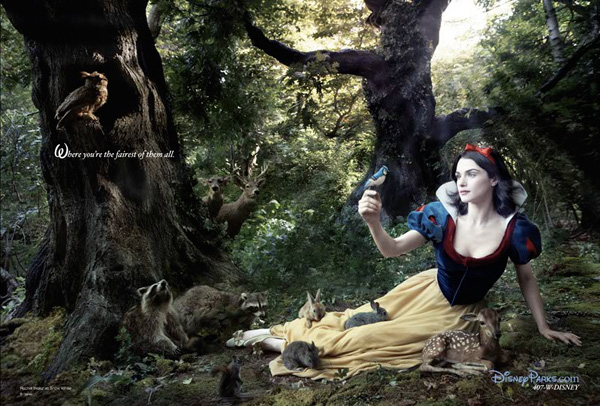
Rachel Weisz as Snow White “Where you’re the fairest of them all.”
Tell me these aren’t the most stunning rendition of Disney art to date! LOVE! Alright before I start getting carried away and prattle on about how epic I feel these images are, let’s examine one…
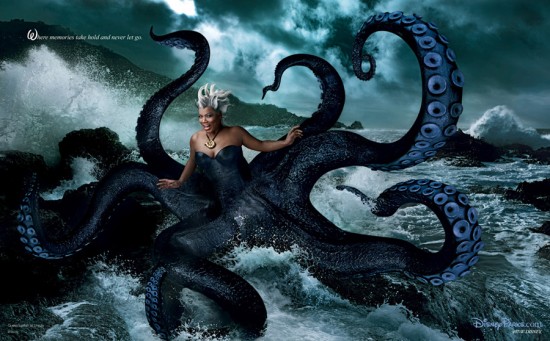
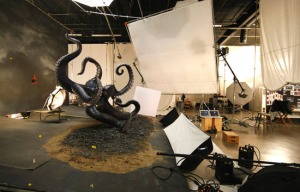
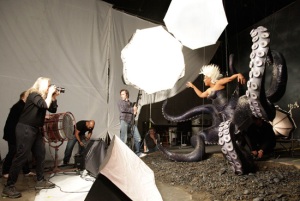
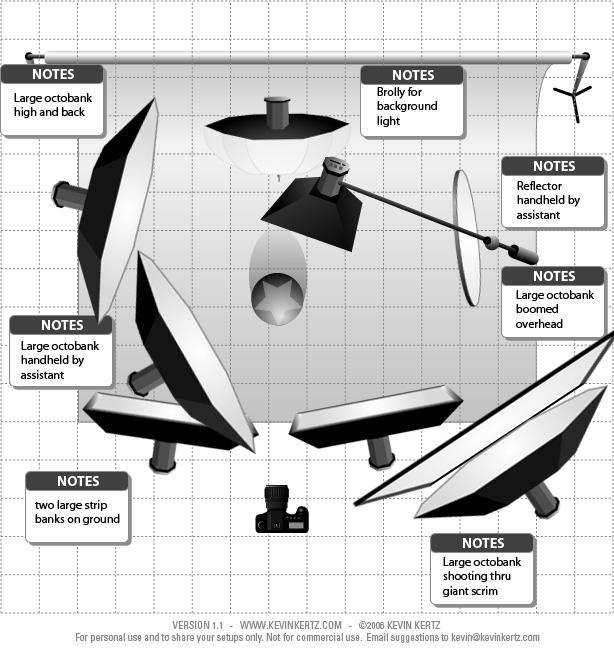
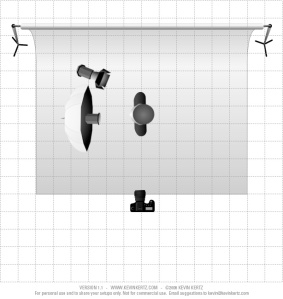
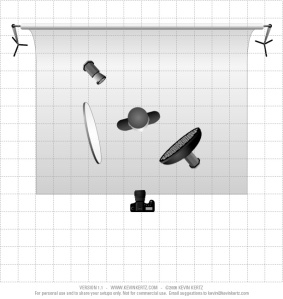
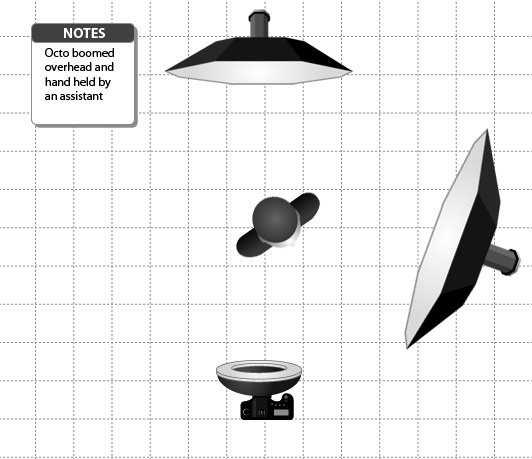
Here is Queen Latifah portrayed as Ursula from the Little Mermaid. Amazingly I stumbled upon some behind the scenes photos of the set from different angles, so I think this diagram is a pretty good representation of the set up.
The Breakdown:
To camera right, a large octobank shooting through a large diffusion panel toward the Queen. Two large strip banks on either side of the camera, low, illuminating the underside of the tentacles. Two large octobanks, one above and slightly behind the Queen camera left, and the other handheld by an assistant at 45 degree angle to Queen also camera left. Another large octobank is boomed overhead, an umbrella illuminates the background, and a reflector held by an assistant camera right. Quite an impressive set up! Understandably as there are several moving parts and awkwardly twisting tentacles. Overall beautifully soft soft illumination.
Here’s a behind the scenes video you can see the whole thing in action:
How fun would it be to climb into that get-up!! And Queen Latifah makes the perfect Ursula! Beautiful lighting, amazing final image.
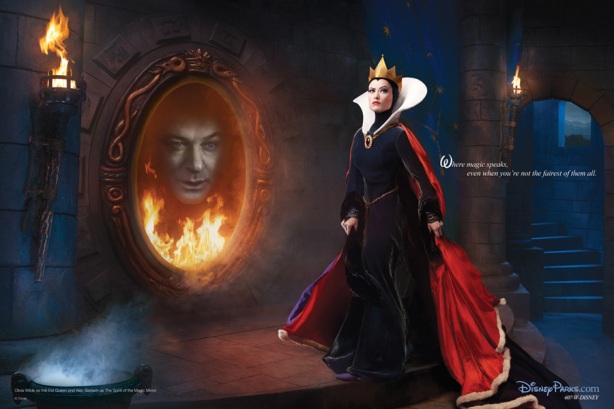
Another amazing Disney Dream Portrait is the Evil Queen in Snow White portrayed by Olivia Wilde, and Alec Baldwin as the Spirit of the Magic Mirror. The tagline reads “Where magic speaks, even when you’re not the fairest of them all.” Gorgeous. Let’s take a look at the different parts to this image…
The Breakdown:
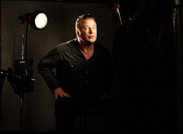
This portrait was created in stages, the flaming Magic Mirror shot alone, then Olivia Wilde, and Alec Baldwin separately. Olivia Wilde was shot with a single strobe though a brolly. She had a head on the ground illuminating the smoke at her feet. You can see the setup in the video below at 0:47 sec.
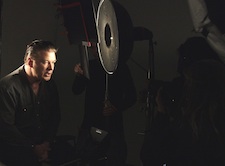
Alec Baldwin was the Spirit of the Magic Mirror. He was lit with a gridded beauty reflector on a ring flash on his left and a strobe reflector gave his hair beautiful rim light to his right.
What a gorgeous final composite! The lighting for the characters in this piece was perfect for the mood of the villainous lair. Flames, smoke, deep shadows, pockets of light, all add to the mystery, intrigue and drama. This is one of my personal favorites of this series and I can’t wait for more to come!
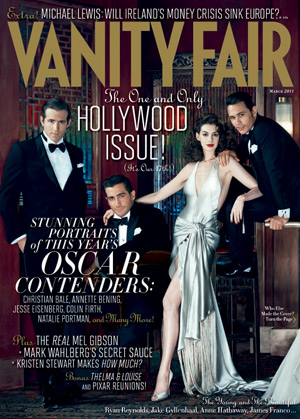
I’ll go ahead and put my heart on my sleeve and admit that these Disney Dream Portraits evoked such emotion and nostalgia it gave me goosebumps. They resurrect the romance, imagination, and childhood fantasies that we as adults constantly are suppressing, and through such powerful visions, AL has truly found her way into the hearts of all genres. From the gritty edgy pages of Rolling Stones, to the sophisticated grace and glamour of the covers of Vanity Fair, and now the whimsical innocence of the classic Disney characters — AL once again proves herself as one of the leading and most influential artists of our time.
While I’m baring my soul like this, let me now talk about another photographer whose work also means a great deal to me…Patrick Ecclesine.
PATRICK ECCLESINE
Patrick Ecclesine is not a household name like Annie Leibovitz … well, not yet. But he will be. He’s amazing. I didn’t know who he was until recently, and now any chance I get I’ll pull a shameless plug to get his name out. Why? Because I’m in love with his work. If you aren’t familiar with him, take a minute to check out his site www.ecclesine.com. Like, right now. Trust me, it’ll knock your socks off!
copyright Patrick Ecclesine, www.ecclesine.com
Patrick shoots ad campaigns for the Hollywood studios, and like Annie he shoots for major magazines like Vanity Fair. In particular, I have a personal fondness for his book Faces of Sunset Blvd: A Portrait of Los Angeles. Really, everyone should have a copy of it. It’s so compelling it actually tied for first place with Annie Leibovitz’s book “At Work” to win the 2009 SCIBA Art and Architecture Book Award. I can speak of this book with the same teary-eyed nose dripping nostalgia with which I speak of the Disney Portraits because its contents strike so close to home for me.
Like me, he’s an Angeleno, born and raised. And like me, he loves this city. Just browse through the pages of his photo-documentary book and you’ll see what it means to live, work, grow and be in Los Angeles. He’s reached into the heart and minds of the people you pass every day — people you may or may not notice from the crack addict on the streets to the governor himself — people brought together from all walks of life and every corner of the globe, and has documented the psychology and subcultures that make Sunset Blvd the “Boulevard of Dreams”…well some argue “Boulevard of Broken Dreams.”Within its pages you come to see that all the fear, hopes, and wisdom of the world resides literally just down the street (or boulevard) and all one has to do to bring their dreams to fruition is find (or create) the path that will bring them there. Then follow it. Through stunning imagery and powerful dialogue, Faces of Sunset Blvd presents individual real life moments in an intimate exploration of the steps and paths we take as we sing, dance and exist together as one…and it is beautiful.
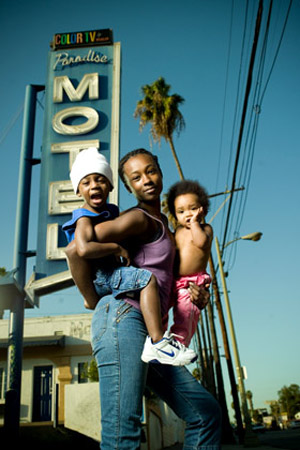
Take a look at this photo taken at the Paradise Hotel of Nay Nay Davis and her two sons.
“I just walk the streets asking for money every day. That’s all I do until I find a job, but most people don’t want to hire me because of these kids. It’s really hard on me right because I have two kids, and I’m taking care of them, you know. I’m a single parent.
I just barely moved out here, almost a month now. I was living in a hotel room and I had no more money, so my cousin allowed me to stay over here with her, but now she’s saying I got to go, so like I don’t have no where to go. I don’t know where to turn to. It’s really hard. It’s getting to that point where I’m about ready to do anything for these kids. Well, almost anything.”
copyright Patrick Ecclesine,
excerpt from Faces of Sunset Boulevard
How heart-breakingly beautiful is this image? In this one snapshot, one moment, you can feel their day to day struggles, the pain, the frustrations, as well as the extraordinary joy they share together. And that’s what a true artist does. That’s what Patrick does.
In an interview with Digital Photo Pro Patrick discusses the lighting he chose to do for this book:
This style of photography that I’m doing is cinematic. It tells a story. It’s a moment heightened by creative use of lighting. I’m emphasizing my subjects with light; I’m bringing them out of the background, dropping the background down and making my subject first and foremost.
I believe for this particular shot, it was a simple lighting setup of a Profoto head through a Photek Softlighter. Many other great photographers like to use this “less is more” approach like Michael Muller and Art Streiber…
In this interview with Shutterbug.com, Patrick goes into more depth about the specifics:
I shot strobes throughout. Motion picture lights are not practical on the street. They’re too hot, too heavy, and require too much electricity. I started with simple hot-shoe flashes; the Vivitar 285s came in pretty handy. I liked to use them in an extra small softbox with a Lumedyne battery to keep the battery cycle time down. But I found they had power limitations, so I graduated to Profoto Pro-7bs—1200 watt-seconds, completely reliable, nothing compares.” For the big productions, like the L.A. fire department photo, Patrick got a 750amp generator to feed the 31 Profoto 2400-watt-second packs it took to provide the power for the f/16 exposure that held everyone in focus. Throw into the lighting mix a collection of softboxes, umbrellas, reflectors, and pretty much whatever else he could get his hands on and you’re ready for street photography, Hollywood style.
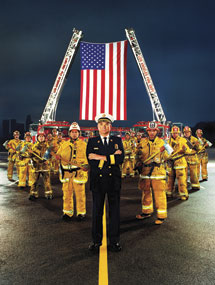
William Bamattre, former chief, L.A.F.D
from Faces of Sunset Boulevard
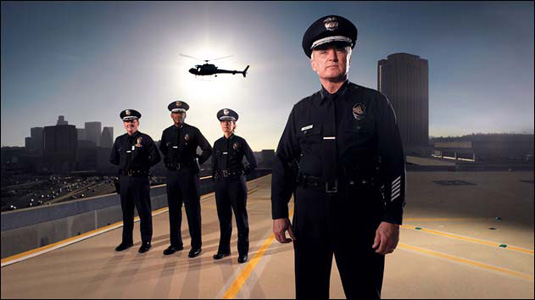
Let’s now take a look at another one of my favorite photos from Faces of Sunset. This is a portrait of William Bratton, Chief of the Los Angeles Police Department, with a helicopter flying into the sunset with impossibly perfect timing just as the shot was taken.
Okay I have to give Patrick mad props for pulling this one off. That’s a real helicopter! Four months of negotiating and planning to get the 5 minutes it took to take this shot. I don’t know anyone who would go to all that trouble when it would have been so easy just to add that helicopter in later in post. The saying “there’s a fine line between crazy and genius” comes to mind…I say genius. That’s just his style. Fortunately Patrick did a behind-the-scenes video for this shot or no one would ever believe him! 🙂 And as an added bonus, we are able to take a peek at the lighting setup he used!
Here is the video of the making of the Chief William Bratton portrait:
The Breakdown:
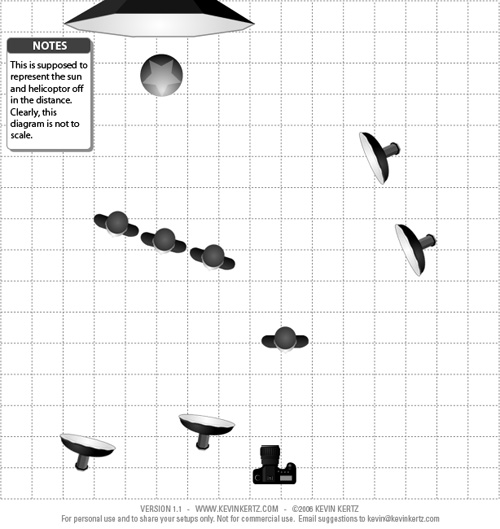
From what I can see in the video and what I can extrapolate from highlights and shadows of the photo itself, there were 4 heads used with a diffused dish as they shot into the sun. One focused on the Chief a little camera left. Another higher and further camera left to illuminate the 3 other officers. Two other heads are used camera right providing rim light on the camera right side of the officers.
So what do you think? Pretty incredible stuff huh! I could go on and on, but we’d better keep moving or we’ll be here all day. Let me just finish by saying, watch out for this guy…you’ll be seeing a lot him for sure!
So while Annie Leibovitz and Patrick Ecclesine’s style are more about realism, others are, well, not so much. Photographers such as Jill Greenberg, David LaChapelle, and Dave Hill use the ring flash as an integral part of their somewhat harsher lighting techniques. Let’s start with the famous Jill Greenberg lighting…
JILL GREENBERG
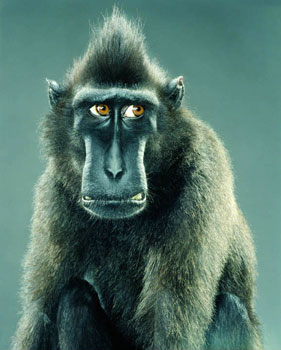
She uses this layered lighting technique in her series of monkeys and bears, and in her controversial book “End Times”, which “presents a rare view of pure emotion—the unadulterated rage, fear, and sadness of young children who, not yet socialized, give themselves over totally to the emotional experience. ” (www.manipulator.com) Here’s a couple examples:
copyright, Jill Greenberg. From her “End Times” series.
copyright Jill Greenberg. From “Monkey Portraits.”
www.manipulator.com/
The Breakdown:
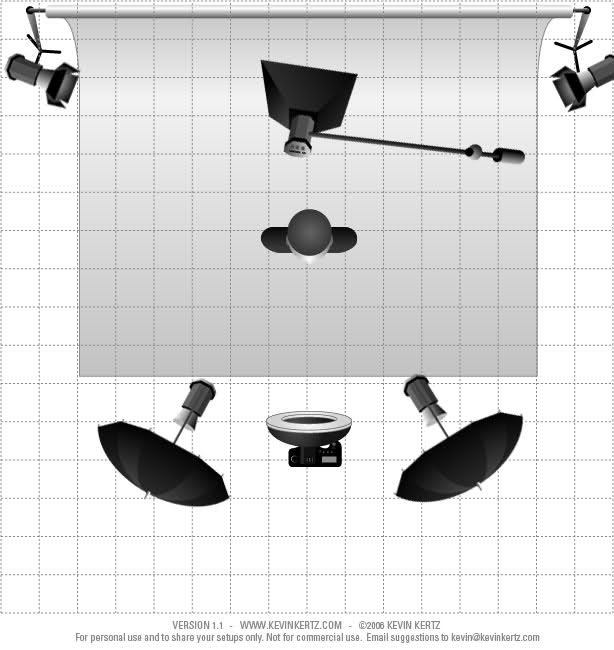
A ring flash is used either in front of and above the camera or used on the camera. Two umbrellas are to the left and right of camera. A boomed overhead beauty dish. Behind the subject, two heads on either side with grids or flagged off to create the hair and shoulder rimlight. If creating a background glow, an background light would be used.
This is the lighting schematic for this type of shot…
Thank you weighter on www.photocamel.com
You would probably also add a background light to this diagram for the babies. Simple as that!
You can see Jill Greenberg in action and the use of this lighting setup as she shoots a bear in this video “Cool Hunting”. She also shows examples from her monkey series rocking the same light layers. Way cooool hunting…
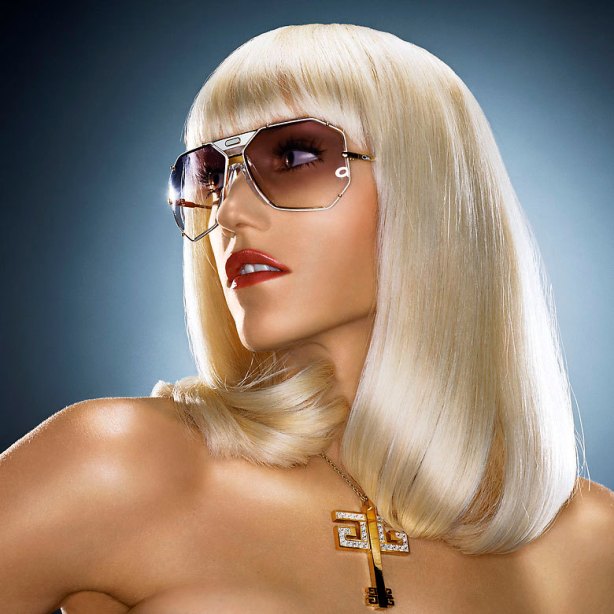
Gwen Stefani loved this look so much she asked JG to shoot her in this style for her Sweet Escape album. I think it’s probably next to impossible to take a bad picture of Gwen, but I especially love how edgy she looks in the JG style.
You can see the action happening in this video. Here JG uses the ring flash on the camera as opposed to above the camera when shooting the bear in “Cool Hunting”:
Now, I can appreciate and enjoy JG’s work, but wait til you see some pieces by Dave Hill! He almost always uses the ring light, utilizes some of the same principles as JG, but takes it to a whole new level!
DAVE HILL
Okay, I’m so excited to talk about some of the lighting for Dave Hill. His work really blows me away! If you aren’t familiar with his style of photography, here are some examples but I would take a few minutes to visit his site www.DaveHillPhoto.com and really explore.
copyright Dave Hill, www.DaveHillPhoto.com
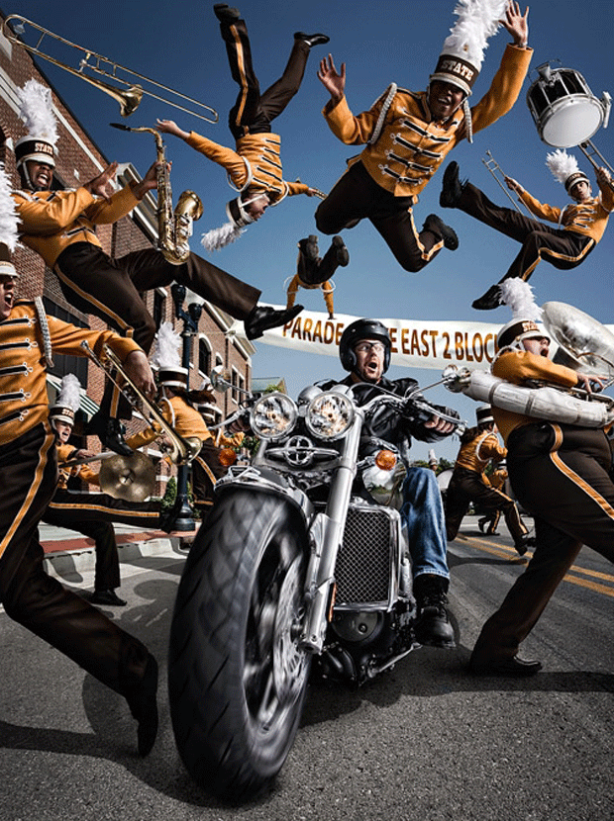
Pretty sick. As I mentioned before, he takes advantage of the ring flash, usually on camera, and often lights his subject very similar to Jill Greenberg. However, Dave Hill creates stories in his images. His scenes are often extremely dynamic with several moving parts meant to capture a climactic moment. The different elements often need to be shot in separate stages and it’s this careful crafting of appropriate light for the individual parts in order to stitch together a convincing and powerful composite that really demonstrates his creative vision.
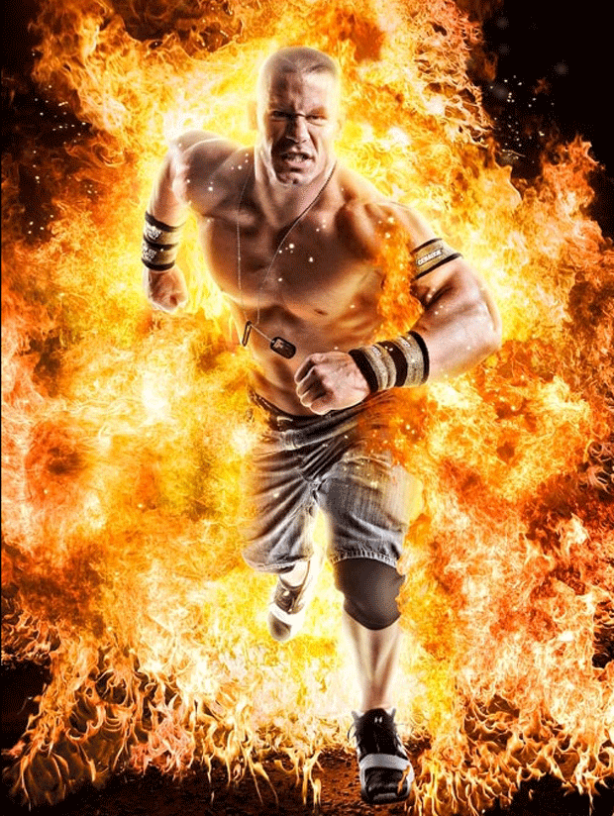
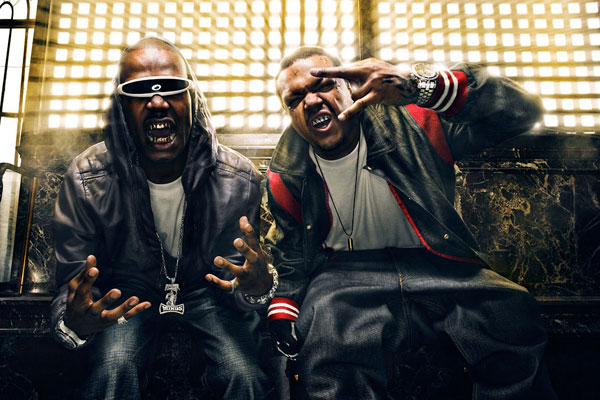
One of the alluring things about his images, at least for me, is how literally explosive they tend to be. Within the context of the story there is often some burst of light or equivalent force of light through stars or pinholes, etc. Let’s look at the cover art for Three 6 Mafia for example. Clearly in both of these images there is light “force” emanating from behind. Both are strongly backlit to create the burst of light.
The Breakdown:
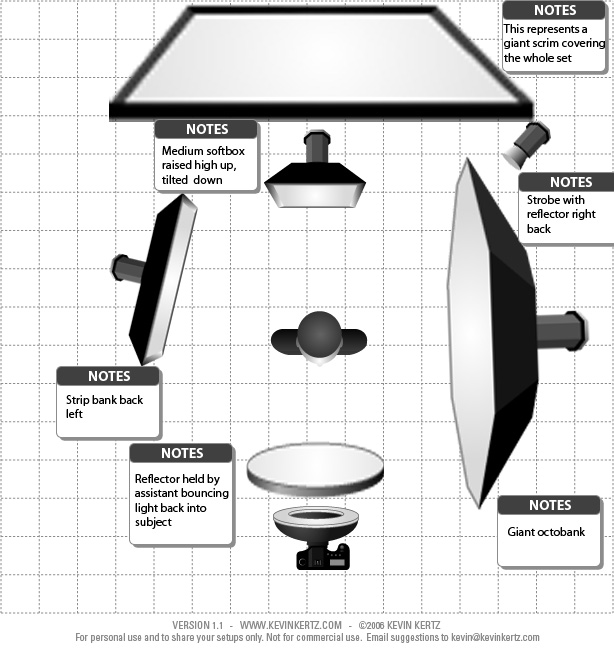
Dave uses a ringlight on camera and bounces light back using a reflector underneath the ringflash. Camera right there’s a huge octobank illuminating the subject, a strip bank camera left and behind the subject casting a well-defined rimlight on the subject’s right. A medium softbox is placed behind the subject and tilted down overhead, and one strobe plus reflector is placed in back of subject camera right. A huge scrim is placed over the entire set.
The band members are shot individually for this image and for the one to go second, the strip bank, the octobank and flash head are all simply reversed.
Breakdown:
Here, the two musicians were shot together, again with ring flash on camera shot low. A reflector bounces light back up from underneath the ring light. Two strobes on either side in back of the boys. Softbox boomed overhead, and a huge octobank directly behind the bench they’re sitting on, pushing light through the holes.
Pretty damn sweet! Here’s the BTS:
courtesy Vimeo.com
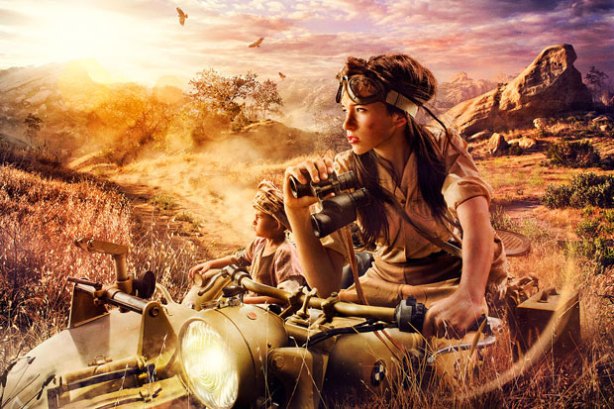
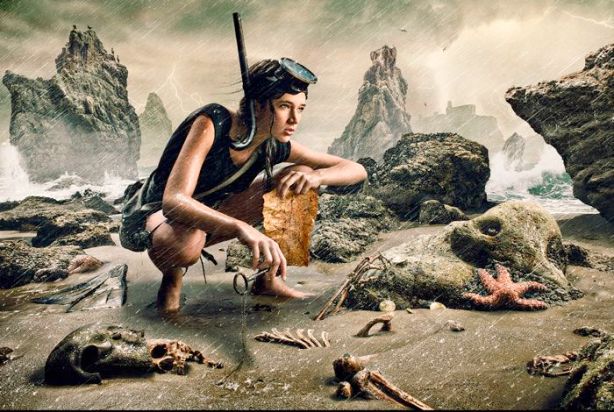
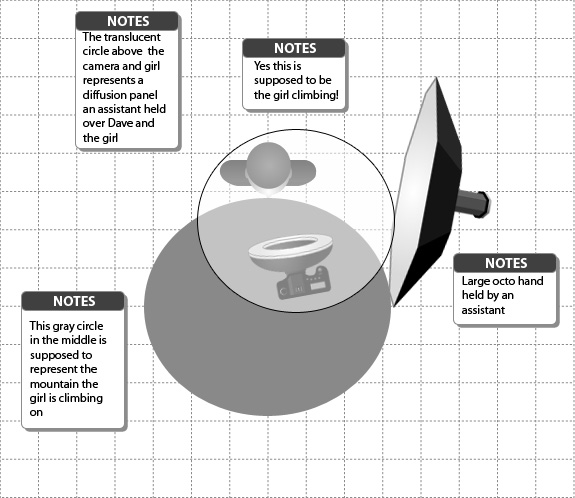
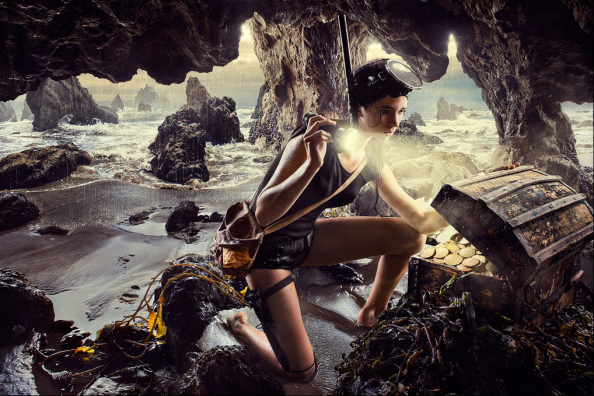
He also did this awesome series called “Girl on an Adventure”. And as I was examining the lighting he used for the different photos, I thought I’d include three of them as an exercise in showing the subtle differences that occur in building light layers. This first image is the girl climbing a mountain lit only by a hand held octobox and an on-camera ring flash. There was also a diffuser held above them by an assistant. As you can see the light quality is pretty soft. Not the usual Dave Hill style we usually see, actually, but that may be due to the limited space and difficult terrain…who knows…it still rocks!

This next one is basically the same lighting setup as the previous, except here there is no diffusion panel and an octobox, hand held by an assistant, is boomed overhead. As you can see, the lighting is less diffuse and there is now a subtle rim light on her arms, causing a little more drama.
Finally, in this third one, there is a strobe with a reflector added, causing a strong rim light and intensifying the drama even more.
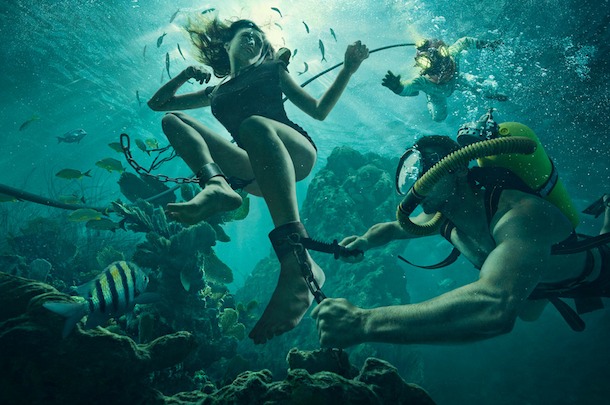
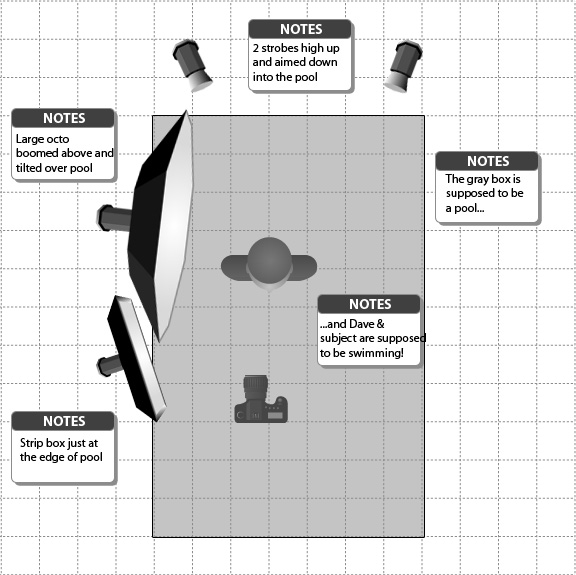
And I just thought this picture was so bad ass I had to include it! It was of course pieced together — the individual swimmers shot at different times in a pool, the ocean floor and tropical fish captured on a separate day at the keys, and even the bubbles were shot in a fish tank! Below is diagram for the lighting as the swimmers were being shot…
Are you as excited about the final image as I am?! I love love LOVE it!!! Figuring out these lighting techniques is so cool! 🙂 I feel like a kid in a candy store…it’s like Christmas! haha! Wow I am the world’s biggest nerd…but I could draw up these freakin diagrams all day long!
And just for comparison’s sake, I should mention another artist whose work is very similar to Dave Hill’s but his lighting is slightly different.
Joel Grimes is another photographer who often uses composites to generate a dramatic portrait. His lighting is usually pretty simple however, and he doesn’t use the ring light as much as his compositing photographer counterparts. A 3-light setup serves his purpose with a softbox or beauty dish in front of the subject and directly above camera, and two baffled or flagged off softboxes on either side and behind the subject for strong rim light. Check out his work at www.joelgrimes.com
I think it’s pretty obvious that, besides their specific lighting styles, much of that edgy super gritty look achieved by Dave Hill and Joel Grimes imagery results from the unique technique they use to process their photos in post production. Their subjects are often captured lit in their style, and then superimposed onto some dynamic background they’ve usually shot separately. Both Dave and Joel typically create their vibrant backgrounds using HDR. It is extremely effective in creating that intense dramatic mood that is part of their signature look…but we’ll save HDR for another blog topic…
I absolutely love the work of Dave Hill and I love the Dave Hill look! I know I’ll be revisiting his photography as a topic of discussion in many more blogs to come…
Now I’ve been discussing these very talented artists who tell amazing stories through their skill in extreme lighting, compositing, and post-processing. However, I’d like to end with an artist who is very much a realist and shoots with the purpose of creating “honest” portraiture…Martin Schoeller.
MARTIN SCHOELLER
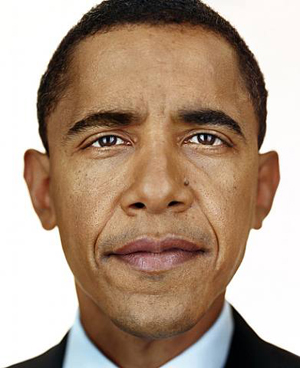
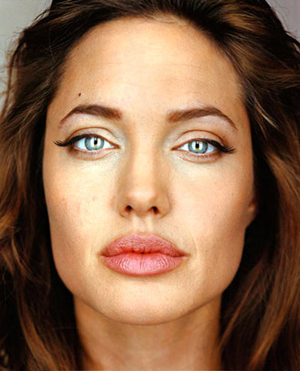
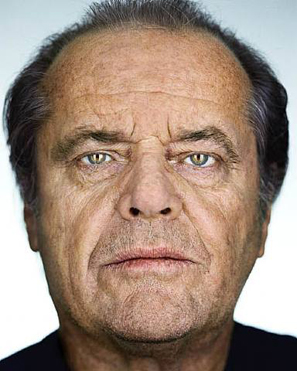
Martin Schoeller created a book “Close Up” where his subjects are photographed, well, close up. Taking inspiration from Richard Avedon who “has taken many very harsh portraits in his life where his subjects don’t come off necessarily very flattering”, he strives to create portraits “showing a person for who they are and what they look like without retouching, without tricky lighting, without distortion, without crazy wide angle lenses, without any cheap tricks, just straight up honest portraits.” (Smithsonian.com, 2009) Most are celebrities and politicians, and I think we can come to agreement that these images certainly don’t come off necessarily very flattering…let’s see some examples…
copyright Martin Schoeller from “Close Up”
So what do you think? Definitely seeing them in a different light eh? (no pun intended) So just how were these shots created?
Whereas Jill Greenberg and Dave Hill use the ring flash incorporated into a layered stobe lighting setup, Martin Schoeller takes advantage of continuous lighting to create his signature look.
In this interview in Smithsonian.com, Martin Schoeller breaks down his lighting technique:
I use a medium format camera that takes roll film. I light them with these light banks. Fluorescent light. Basically they look like fluorescent light bulbs but their color temperature is daylight color temperature. They’re called Kino Flos. They’re mainly used in the film industry, because it’s not a strobe light, so it’s not actually that bright. I mean they’re bright to look at because they’re much brighter than the flashing strobe obviously. But they’re for a very shallow depth of field and a very narrow depth of field which kind of also emphasizes what I’m trying to do with bringing out the eyes and the lips, where most of the expression in a person’s face is all about the eyes and the lips. I try to get my focus right so the eyes and the lips are the focus. Everything falls away so quickly because of the shallow depth of field. Everything else becomes secondary. So not only am I focusing on just the face, I’m even concentrating it more by having everything else look like it’s out of focus.
(trivia: was Annie Leibovitz’s assistant for several years)
Here’s a rough schematic from www.GuessTheLighting.com . I know, I know. http://www.GuessTheLighting.com isn’t exactly accurate, but I’m sure this diagram is a pretty good representation. I mean, you can see the kino flo catchlights in the subjects’ eyes and MS described it above anyway…it’s fine.
You can see Martin in this behind the scenes video from Strobist.com He’s shooting a woman bodybuilder here, but except for the head between the two kino flos, the setup is basically the same.
Interestingly enough, in almost the exact same lighting setup, famed LA and NY headshot photographer Peter Hurley uses kinoflos to create headshots that are very flattering to his subjects. However he uses 4 Kinoflos in a square formation, producing even shadowless lighting and generating his signature large catchlight.
I just have to throw this little tidbit in. I’ve always loved the work of Peter Hurley. He’s one of my favorite headshot photographers even if he uses the same lighting set up for almost all his subjects. Who cares. If you got a good thing, rock it. And the stark difference between the work of Martin Schoeller and Peter Hurley, despite the similar lighting I think is a testament to the person and unique creativity behind the camera. You can see some of his work at www.peterhurley.com Rock on Pete! 🙂
Alright guys, I’m having so much fun I don’t want to stop but this blog has gotten to be a little long! I have like 5 other photographers whose lighting I want to dissect but I think I’ll continue on another blog…I hope you’ve found learning these lighting styles to be as exciting and fascinating as I have and not just a big snore! 🙂 haha! Until next time guys…
